Please see our usage guide for first steps on scanning with ReconstructMe.
No, a license will not effect reconstruction performance. Instead, please check if your system has a powerful graphics card inside. If you have a powerful graphics card, try to update your display driver and make sure that ReconstructMe uses the correct device.
Make sure that your system meets the minimum hardware requirements. If you own a system with multiple graphic cards built in, make sure that ReconstructMe is configured to use the most powerful one. You can do this by manually selecting the device in the Device tab of ReconstructMe. Next, ensure that you have the latest GPU drivers installed.
Make sure your sensor is connected to the computer. In case your sensor requires an external power supply, also ensure the adapter is plugged-in. In the Windows device manager check if your device is listed and marked as functioning correctly. Ensure that you have the latest sensor drivers installed.
Achievable accuracy depends on various factors such as
- Sensor resolution and accuracy
- ReconstructMe results are strongly linked to sensor accuracy. Accuracy tells you how how closely the output from a sensor will match the ‘true’ value. Unfortunately, the term accuracy is used differently among sensor manufacturers and therefore you can often find figures on the resolution of the sensor only. Resolution is the ability to resolve differences. Its the minimum theoretical difference it can spot. High resolution therefore means the sensor is able to resolve small differences. The accuracy of a system can never exceed its resolution. In practice the accuracy is much lower than the resolution.
- Camera tracking
- ReconstructMe tracks camera movements by evaluating differences between camera images. Therefore, if the target object does not offer any features to track (e.g planar objects), tracking will be faulty and so will be the resulting scan. Camera tracking is also effected by the amount of movement between two subsequent camera frames. The larger the movement the higher the chances for bad alignment.
As you probably have noted by now, it is hard for us to come up with a single number on the accuracy of the ReconstructMe, as it depends on many factors. However as a rule of thumb with most currently available sensors, ReconstructMe achieves under ideal environments an accuracy of 5-8 millimeters on a 0.5 meter part.
The following comparison stems from discussions about ReconstructMe accuracy. It compares a high quality structured light scan and ReconstructMe scan of the same object. Worst case deviations are 5mm around object borders.
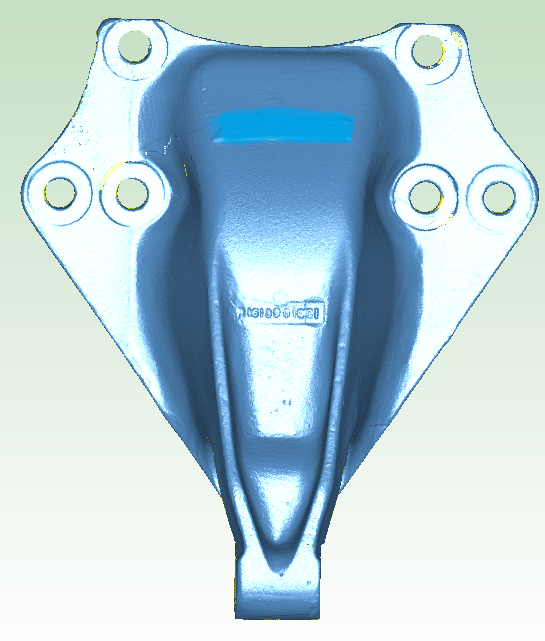
Baseline structured light scan at accuracy +/- 0.1mm

ReconstructMe scan
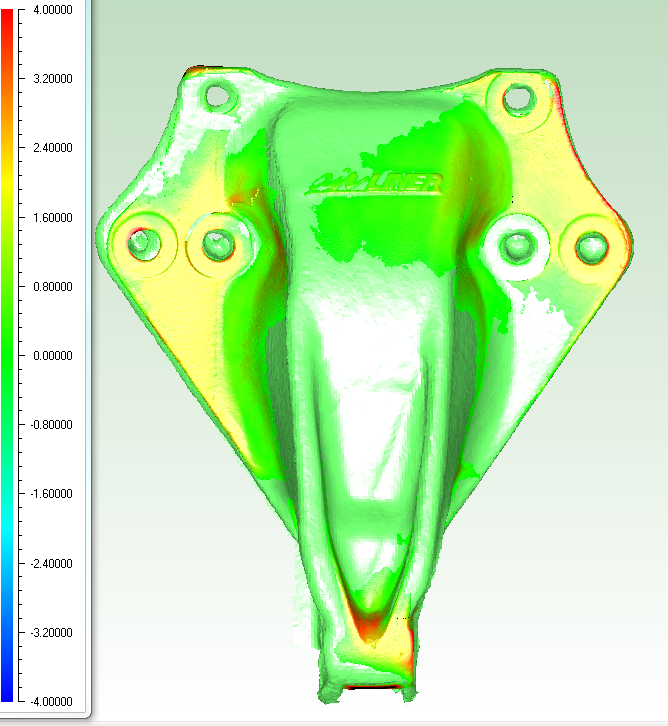
Deviations in mm
If you accuracy you can achieve is far from the above, you might want to read about improving the quality of your results: How can I improve the quality of my scanning results?
 A selfie is a type of self-portrait photograph, typically taken with a hand-held digital camera or camera phone. Shown on the right a self-portrait of a female monkey, who had picked up photographer camera and photographed herself with it.
ReconstructMe extends the selfie idea to 3D. Using the self-portrait feature in ReconstructMe, everyone can generate 3D printable busts in a minute. Below is good example of an 3D self-portrait outcome without any manual postprocessing.
What do I need to do?
 Follow these steps to generate a 3D selfie
- Position the camera horizontally and on eye-level height infront of you.
- Activate Selfie mode in ReconstructMe’s Surface settings area.
- Click the Suggest Defaults button if you are unsure about good settings to start with.
- Click Start to begin the selfie scan.
- Turn around 360 degrees in either direction – reconstruction will stop automatically.
- Wait for the post-processing to complete and save your model.
Your model is now ready to be opened in your favorite 3D printing application or uploaded to any 3D printing service. The video below runs through the above steps.
Any best practices?
Here are a couple of things to take into consideration when generating selfies for optimized results.
Ensure you have enough space
When scanning yourself by turning in front the camera, make sure that you are the only object within the reconstruction volume. Double-check this in the live preview at the Volume tab of ReconstructMe.
Rigidness and constant facial expression
Try to avoid changing your facial expression during the scan or the pose of your body. When doing a colorized selfie, avoid changing the position of your pupils with respect to your eye. We’ve built in a couple of helpers in ReconstructMe that will help you to achieve this.
- Use the Handling / Start delay setting to increase the time before scanning starts. This will give you enough time to put you in optimal pose.
- Activate Handling / Sounds. This will play a countdown sound at start and a ta-da sound when the scan completes. So, no need to stare at your screen. Note, you need to set Handling / Start delay to a minimum of 5 seconds to hear the countdown sound.
Constant lighting conditions
When doing a self scan without the help of somebody else (e.g by rotating in front of the camera) make sure that the lighting in your room is diffuse or use a spot-light that is placed directly on the camera and facing in the same direction. If the room you are sitting in has a window through which light enters, make sure that the window is directly behind the line of sight of the camera. Even better: get the help of a friend who moves the camera around you and who avoids casting shadows on you.
Camera placement and calibration
Make sure to place the camera horizontally on eye level height before the scan starts. The same placement should be taken when the scan starts and the camera is weaved around you by a friend. If you get a visible seam artifact in your result do the following
- Modify the start position so that the camera looks from behind your shoulder. This will place the seam on the back of your model where it won’t be as visible as if the seam runs straight through your face.
- If you have a PrimeSense Carmine 1.09 we recommend to use a custom calibration file. Download the file and tell ReconstructMe about it in Device / Sensor.
What do I get?
When in selfie mode, ReconstructMe generates a 3D bust that is printable without further modifications. Here is what happens in detail
- Watertight
- Watertight refers to a property of 3D meshes that allows the 3D printer to determine the inside and outside of meshes. A mesh without holes is often referred to as watertight, because when you fill-up the inside with water, no water will drop out. ReconstructMe will enforce this property.
- Cut
- ReconstructMe slices the model on the bottom to generate a nice planar stand of your bust, so that it does not fall over when being put down.
- Oriented
- ReconstructMe will place the origin of the model on the center of the base of the bust with positive z-direction pointing upwards towards its head. This will allow you to directly import the bust in your favorite 3D printer application and your bust should already be placed on the printer’s virtual platform.
- Scaled
- Since your 3D printer won’t be able to print you in full-size, ReconstructMe scales your model down to 20cm when saved. Note, the saved model dimensions are in millimeters.
Scanning can be a tedious process if the scanning environment is not optimal. Here are some general tips on how to optimize your scanning results.
- A high frame rate is vital
- Make sure your graphics card is a decent one. ReconstructMe performs most operations directly on the GPU. If the GPU cannot cope with the amount of data your sensor generates per second, you will observe a drop in frames per second. For smooth scanning you should observe frame rates between 20-30 FPS. Everything below will feel jerky and directly affect the quality of the scan result.
- Keep the sensor pointing at the object
- Tracking can only succeed when the volume to be reconstructed is in view. Pointing the sensor away too far from the object or stretching the distance between the sensor will lead to reconstruction errors. Keep in mind that sensors require a certain minimum distance between the sensor and the object (e.g Kinect requires a minimum distance of 400mm).
- Ensure to have geometric features
- Stable tracking requires geometry that is non-planar and non-symmetric. Make sure that whatever you reconstruct does not entirely consist of a single plane, a cylinder, a sphere or anything else that looks alike from different perspectives. When keeping the sensor fixed and turning an object infront of it, make sure everything inside the volume turns.
- Move slowly
- Depending on the FPS you achieve, you might need to move the sensor more slowly. Fast movements of the sensor will lead to blurry data and thus to reconstruction errors.
- Avoid direct sunlight
- The title says it all. Some sensors (those depending on infrared light) don’t play well with direct sunlight exposure. If you need to scan outside, choose a cloudy day or scan at night.
- Make sure to have enough space
- When scanning an object you should calculate for some extra room, so you can move around the object without effort.
- Scanning a rotating object
- When scanning a object that is rotating, make sure that the reconstruction volume only captures rotating elements and not static elements. Otherwise this would confuse the tracking algorithm which in turn would lead to loss of tracking.
This is most likely due to the limitations of the free version of ReconstructMe.
Didn’t find what you were looking for?